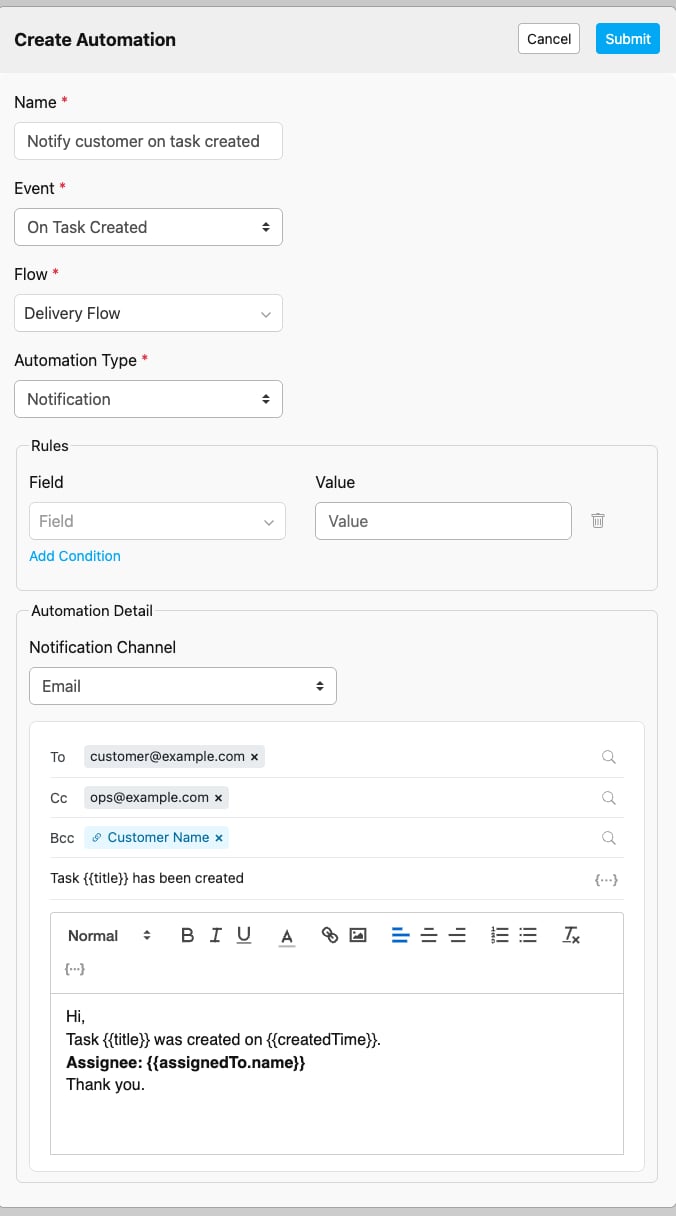
Automation Type set to Notification with Channel set to Email, showing the full compose card (Recipients, Subject, Body).
## Enabling the Email Channel 1. In the automation form, set **Automation Type** to **Notification**. 2. Set **Channel** to **Email**. The WhatsApp fields (Receiver Phone Number, API Key, Message) are replaced by the compose card described below. 3. Fill in at least one **To** recipient, a **Subject**, and a **Body**, then save the automation. Subject and Body are both required for the Email channel. The automation cannot be saved without them. ## Recipients Recipients are organized into three rows, matching a typical email client: | Row | Required | Notes | | - | - | - | | To | Yes | Must have at least one recipient | | Cc | No | Revealed by clicking the "Cc" link above the To row | | Bcc | No | Revealed by clicking the "Bcc" link above the To row |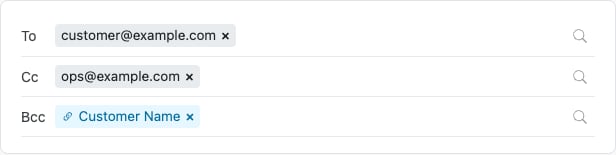
Recipients section with a To address filled in and the Cc and Bcc rows revealed.
Each row accepts two kinds of recipient: * **Static email address.** Type an address and add it as its own entry. You can add multiple static addresses to the same row, but each one must be added individually, a comma- or semicolon-separated list (`a@x.com, b@x.com`) is rejected as a single malformed entry rather than being split into two addresses. * **Task field recipient.** Use the field picker to pull the recipient from a value on the triggering task. The picker only lists **plain text `input` fields** from the Flow's initial page (a text field that happens to hold an email address). Fields of other types (Select, Number, Date, Phone Number, Address, etc.) never appear in this picker, even if their value looks like an email. The picker's tooltip reads: *"Add a recipient from a task field (text input only)."*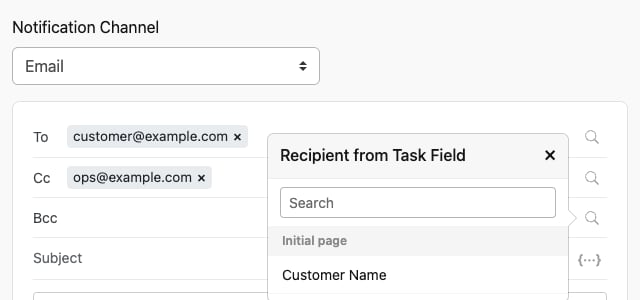
The task-field picker open on a recipient row, listing only plain text input fields from the Flow's initial page.
### Recipient Rules * **Text fields only.** Only plain text `input` components from the Flow's initial page can be picked as a task field recipient. This is validated both in the automation form and again at send time. * **No comma/semicolon lists.** A single entry containing multiple addresses separated by commas or semicolons is rejected as one malformed value, add each address as a separate entry instead. * **50 recipients maximum.** The combined total of To + Cc + Bcc recipients cannot exceed **50**. This matches the hard limit of Mailjet, the email delivery service the platform uses to send automation emails. Exceeding 50 is rejected both when you save the automation and again when it tries to send. * **Cross-field deduplication.** If the same email address ends up in more than one row (for example, the same address is both a static Cc entry and the resolved value of a Bcc task field), the platform keeps it in the highest-precedence row only, in the order **To > Cc > Bcc**, and removes it from the lower rows. ## Subject and Body **Subject** is a plain text field that supports variables (see below). **Body** is a rich text editor supporting bold, italic, underline, font color, headings, text alignment, ordered and bullet lists, links, and inline images.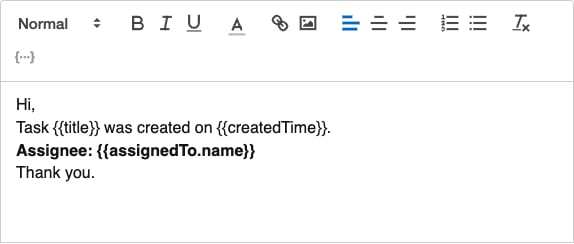
The Body editor toolbar, with formatting options for text style, alignment, lists, links, and inline images.
### Variables Click the variable picker to insert a `{{token}}` placeholder into the Subject or Body. Placeholders are replaced with the actual task values when the email is sent. Two kinds of variables are available: * **Flow fields.** Every primitive component from the Flow's initial page (Text, Number, Date, Time, Select, Phone Number, Address, Currency, URL, Coordinate) appears in the picker automatically, using the field's own name as the token. Container-type components (Bill, List, Subpage, Subflow, Photo, Signature) are not available as variables. * **Standard task tokens:** | Token | Description | | - | - | | `{{_id}}` | The task's unique ID | | `{{title}}` | The task's title | | `{{status}}` | The task's current status | | `{{assignedTo.name}}` | Name of the assigned field user | | `{{createdTime}}` | When the task was created | | `{{doneTime}}` | When the task was marked done | | `{{tracking_link}}` | Public tracking link for the task | | `{{organization.name}}` | Your organization's name |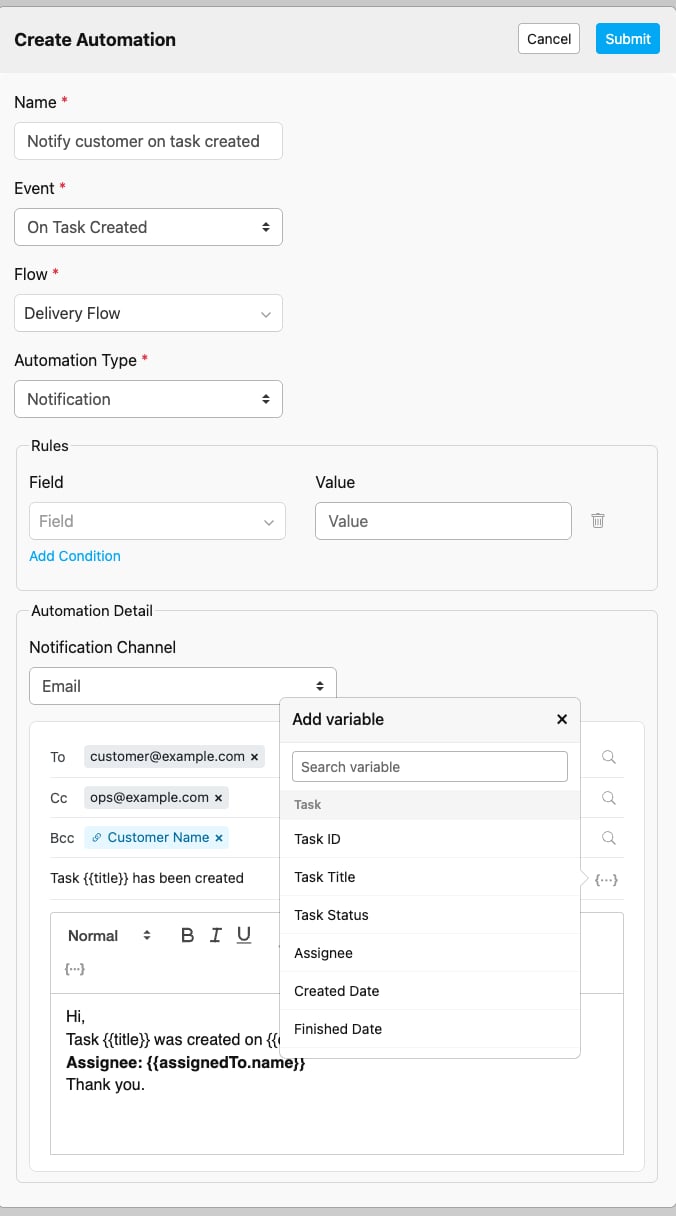
The variable picker dropdown open over the Subject field, listing Flow fields and standard task tokens.
**Example Subject:** `Your delivery {{title}} is on its way` **Example Body:** ``` Hi {{assignedTo.name}} is delivering your order. Track it here: {{tracking_link}} Thanks for choosing {{organization.name}}! ``` ### Adding Images to the Body You can insert inline images directly into the Body editor, either by pasting an image straight into the editor or by using the image button on the toolbar to pick a file. The image previews inline with your text right away. While you're editing, images are held as base64 data, nothing is uploaded to the platform until you save the automation. On save, the platform uploads each image and swaps its `src` for a hosted URL. If you close the form without saving, no image is uploaded. Accepted image formats are **JPEG, PNG, GIF, and WEBP**, with a maximum size of **5 MB** per image. The same limits apply whether you paste the image or pick it from the toolbar. ## Automation Log Open the [Automation Log](/pages/automation/managing-automation/automation-log) for an email automation to see which recipients were sent to and which were dropped. Recipients with an invalid or malformed address are dropped and recorded in the log, so you can tell at a glance which task field's data needs fixing. ## Frequently Asked Questions **Q: Do I need an API key or third-party account for the Email channel?** A: No. Unlike WhatsApp, Email sends through the platform's own mail service. There's no external provider to configure. **Q: Can I use a comma-separated list to add several recipients at once?** A: No. Each recipient must be added as its own entry in the To, Cc, or Bcc row. A comma- or semicolon-separated value is rejected as one malformed entry. **Q: Why doesn't my Select or Number field show up in the recipient picker?** A: The recipient picker only lists plain text `input` fields from the Flow's initial page. Fields of other types are excluded even if they contain an email-like value. **Q: What happens if my To, Cc, and Bcc add up to more than 50 recipients?** A: The automation is rejected at save time. If you somehow reach 50+ recipients later (for example, a task field resolves to a new address), the send itself is also rejected until you bring the total back under 50. **Q: Will the same address ever be emailed twice if it appears in both To and Cc?** A: No. The platform deduplicates across rows, keeping the address in the highest-precedence row (To over Cc over Bcc). ## Related Documentation * [Notification](/pages/automation/automation-type/notification): the parent automation type, covering the WhatsApp channel * [Automation Log](/pages/automation/managing-automation/automation-log): viewing send results and drop reasons * [Automation Events](/pages/automation/automation-event/introduction): events that can trigger a Notification automation